This is a recipe for delivering AirWatch Per-App VPN capabilities using Horizon's Unified Access Gateway 3.3 and a SaaS instance of AirWatch/Workspace One UEM. Configured to act as VMware Tunnel, the UAG appliance is used to provide Per-App VPN connections for iOS apps that require access to internal corporate resources. As Per-App VPN enabled applications are launched VPN connections are automatically established for these apps on behalf of the users in the back ground, providing a very simplified and convenient user experience. Further, VPN connectivity is only made available for the individual app, rather than the whole device, providing better overall security.
Please note that, "Workspace One UEM," is what VMware is calling AirWatch nowadays. I'm going to use the terms interchangeably throughout this post.
Here's a nice depiction of a Basic Deployment using UAG as a VMware Tunnel.
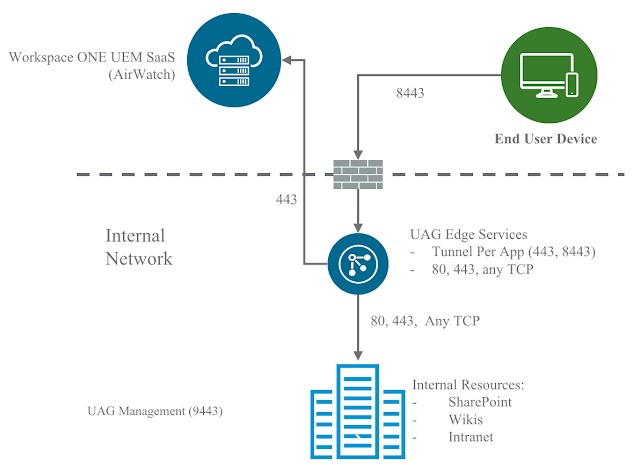
This Basic Deployment involves a single UAG appliance sitting in the trusted network or the DMZ. It's not exactly ideal in terms of security, but arguably suitable for a POC or lab. For a full blown production deployment, you'd more than likely want to go with a Cascade Deployment, which involves the deployment of 2 UAG appliances: One in the DMZ and one in the trusted network.
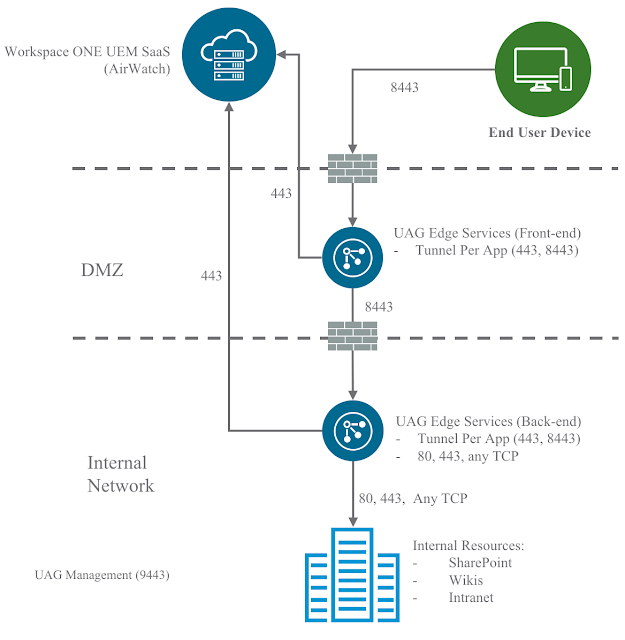
The recipe in this post is for a Basic Deployment but could certainly be adapted for a Cascade Deployment.
For additional details on network requirements, check out this link to VMware Docs.
High Level Outline:
- Configure VMware Tunnel On The AirWatch Console
- Deploy Unified Access Gateway 3.3
- Configure VMware Tunnel On The Unified Access Gateway
- Deploy The VMware Tunnel App
- Configure A Per-App Tunnel Profile For iOS
- Configure Apps To Use The Per-App profile
Configure VMware Tunnel On The AirWatch Console
For this recipe I'm going to use a free eval version of AirWatch that's available at VMware Test Drive. Simply sign up for an account at www.vmwdemo.com and you'll have a free SaaS instance to work with.

Once you have access to the console, navigate to Groups & Settings -> All Settings à System à Enterprise Integration -> VMware Tunnel. Disable inheritance of the default VMware Tunnel settings by selecting the override option. Then select enable and click the configure button.

Select the Per-App Tunnel (Linux Only) option and go with a Basic Deployment.

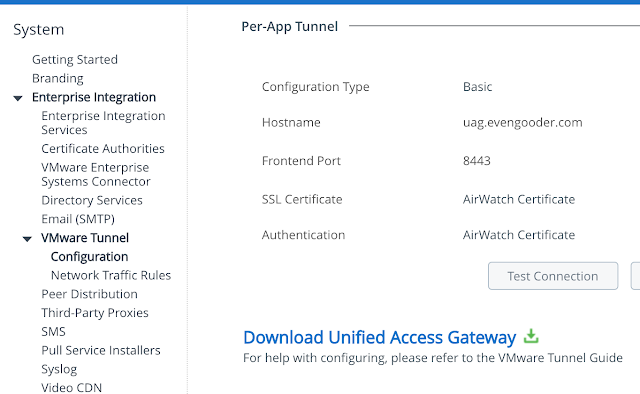
After clicking next, enter in the hostname of the UAG appliance you're going to setup as a VMware Tunnel. Also specify a port to communicate over. The default is 8443. You'll need connectivity to this host and port from any AirWatch managed device you want to provide Per-App VPN capabilities to. For most production deployments this means you'll need a hostname and port that's accessible to the outside world. For a POC or lab used to test devices within a trusted network you could use an internal name and private IP address to avoid mucking around with DMZs and firewall rules. It's all about where the devices you're going to test from are located relative to the VMware Tunnel.
Here's an example configuration:

Accept the defaults of utilizing the AirWatch certs. And next your way through the next few
screens. Confirm the summary settings
and click okay.

Additional guidance on the configuration of this wizard can be found at this VMware Docs location.
Deploy Unified Access Gateway 3.3
The simplest way to initially deploy and configure UAG is through the vSphere Web Client OVF deployment wizard and the gui on the UAG appliance itself. You can download the UAG appliance here from My VMware. Or you can use the link provided in the Workspace One UEM (AirWatch) console under the VMware Tunnel Settings Configuration.
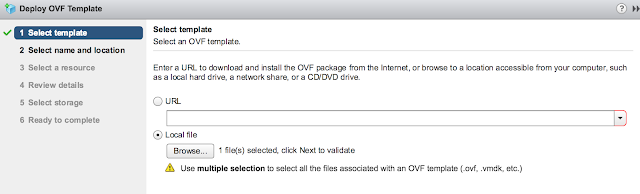
After downloading the UAG appliance fire up the vSphere Web Client and launch the Deploy OVF Template wizard.
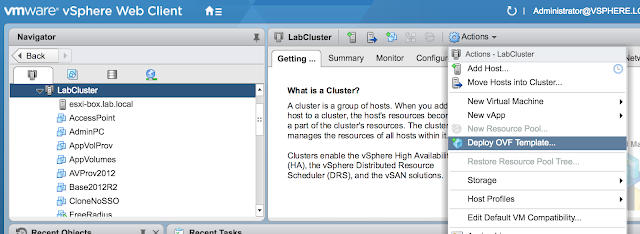
When prompted browse to the UAG ova download and click next.
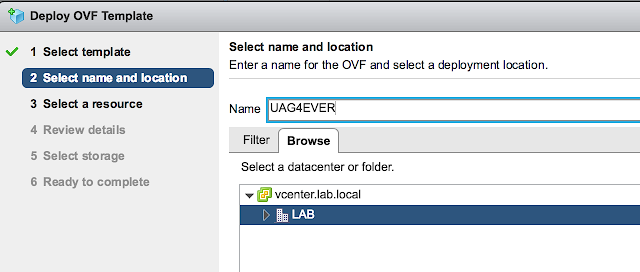
Provide a VM name for the appliance and select next.
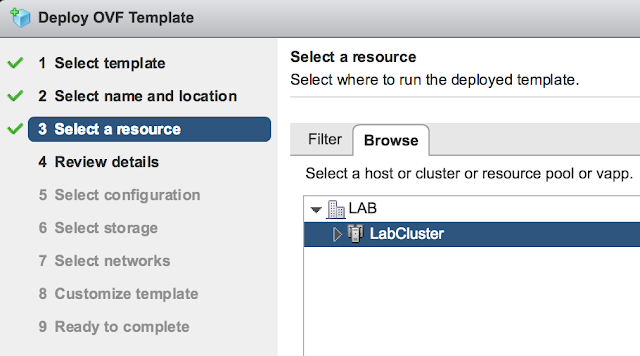
Select a host or cluster for the appliance and select next.
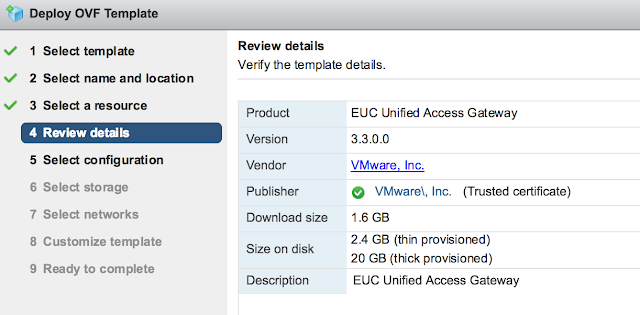
Review the details of the deployment and select next.
You'll be provided with an option of choosing between 1 to 3 nics for the appliance. For a POC or LAB go with a single nic.

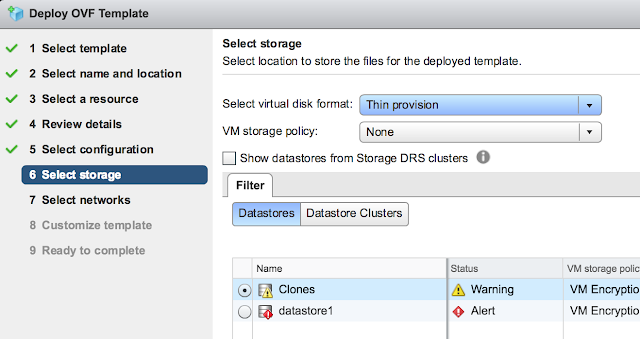
For storage, select the storage that screams at you the least and go with Thin provision.
Confirm the virtual networks to leverage for the different types of traffic.

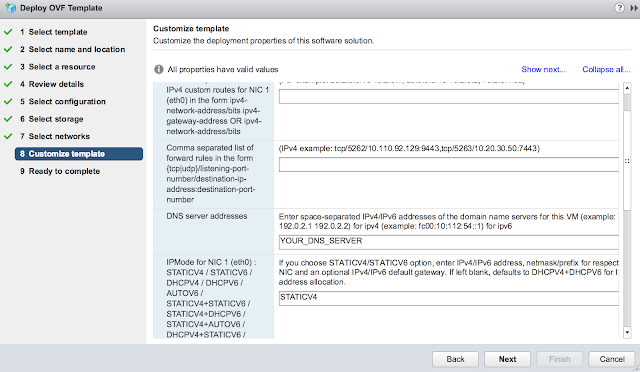
Finally, for the most exciting part of the deployment, the customize template dialog. First off, disable CIEP because you're selfish. Minimize it and get started on the network properties. Skip the first two options about custom routes and forwarding rules. Enter in your DNS server(s) and the appropriate IPMode. (Most likely STATICV4)
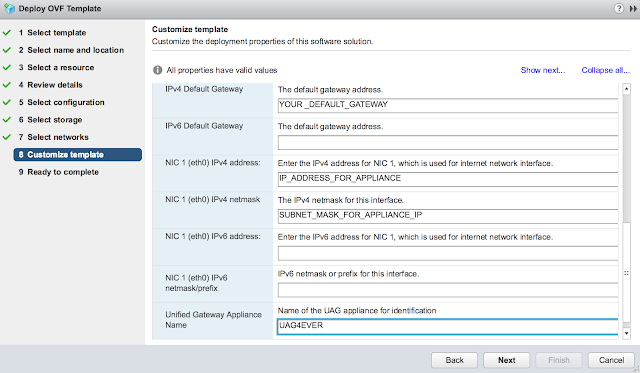
Scroll down further and enter in a default gateway, IP address and subnet mask for the primary nic. Also, enter in hostname for the appliance.
Finally, expand the password options section. Enter in passwords for the admin account and root account.

Confirm all your options and select finish.

Power on your VM once the deployment's complete.
For additional details and guidance on UAG deployments, check out this excellent blog: http://www.carlstalhood.com/vmware-access-point/

After downloading the UAG appliance fire up the vSphere Web Client and launch the Deploy OVF Template wizard.

When prompted browse to the UAG ova download and click next.

Provide a VM name for the appliance and select next.

Select a host or cluster for the appliance and select next.

Review the details of the deployment and select next.

You'll be provided with an option of choosing between 1 to 3 nics for the appliance. For a POC or LAB go with a single nic.

For storage, select the storage that screams at you the least and go with Thin provision.

Confirm the virtual networks to leverage for the different types of traffic.

Finally, for the most exciting part of the deployment, the customize template dialog. First off, disable CIEP because you're selfish. Minimize it and get started on the network properties. Skip the first two options about custom routes and forwarding rules. Enter in your DNS server(s) and the appropriate IPMode. (Most likely STATICV4)

Scroll down further and enter in a default gateway, IP address and subnet mask for the primary nic. Also, enter in hostname for the appliance.

Finally, expand the password options section. Enter in passwords for the admin account and root account.

Confirm all your options and select finish.

Power on your VM once the deployment's complete.
For additional details and guidance on UAG deployments, check out this excellent blog: http://www.carlstalhood.com/vmware-access-point/
Configure VMware Tunnel On UAG
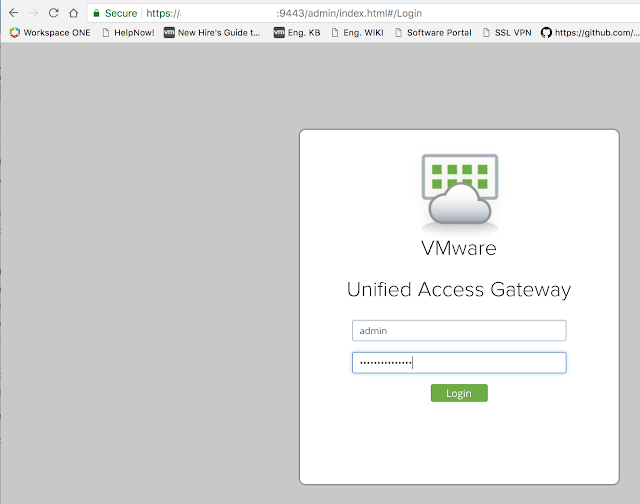
After the initial OVF deployment you can further configure the UAG appliance over a browser by navigating to https://APPLIANCE_HOSTNAME_OR_IP:9443/admin/index.html. Login with the admin account and whatever password you specified for it during the OFV wizard.
Then click on the gear icon next to, "VMware Tunnel Settings." For the API server URL enter in the console URL for your Workspace One UEM (AirWatch) instance. For the API Server Username and Password enter in credentials of an AirWatch admin account with console administrator privileges at minimum. Your organization group id can be determined by going to Groups And Settings --> Groups --> Organization Groups --> Organization Group Details. Finally, for your Tunnel Server hostname, enter in the hostname of the UAG server you specified in the Tunnel Configuration wizard on the console. The final configuration of VMware Tunnel Settings on your UAG appliance should look something like this:

Then click on the gear icon next to, "VMware Tunnel Settings." For the API server URL enter in the console URL for your Workspace One UEM (AirWatch) instance. For the API Server Username and Password enter in credentials of an AirWatch admin account with console administrator privileges at minimum. Your organization group id can be determined by going to Groups And Settings --> Groups --> Organization Groups --> Organization Group Details. Finally, for your Tunnel Server hostname, enter in the hostname of the UAG server you specified in the Tunnel Configuration wizard on the console. The final configuration of VMware Tunnel Settings on your UAG appliance should look something like this:

A minute or two after configuring these settings, logout of the UAG admin gui and log back in. There should be a happy green circle next to your VMware Tunnel Settings.

You can also do a connect test from the AirWatch console. Going back to the VMware Tunnel Configuration settings, click on the, "Test Connection," button.

If things are configured properly you'll see a connectivity status window indicating a recent, "Last Sync Time," in UTC format.
For additional details on configuring the VMware Tunnel Settings on UAG, check this out.
Deploy the VMware Tunnel App
A prerequisite for leveraging Per-App VPN on a device is to have the VMware Tunnel App installed. You don't need to configure it specifically at this point, just get it pushed out. So, go to Apps And Books -> Native -> Public. There, do a search for VMware Tunnel.


Click on the hyperlink for the IOS version then navigate to the assignment tab. From there you can add an assignment of the app to the appropriate assignment group.

Configure A Per-App Tunnel Profile for iOS
Go to Devices --> Profiles and Resources --> Profiles. Select Add Profile.
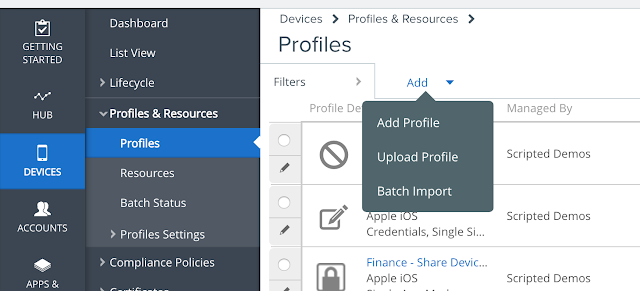
Provide a descriptive name for this new profile.

Provide a descriptive name for this new profile.

Navigate to VPN and click configure.

Note the server text box as been populated with your configured VMware Tunnel server. Check the box for "Enable VMware Tunnel."

Configure Apps To Use A Per-App profile
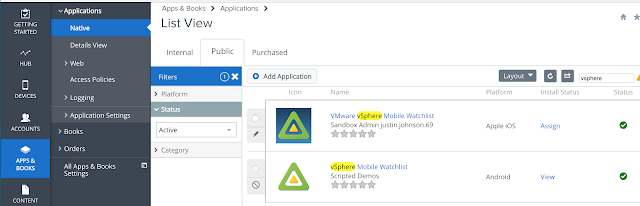
For testing purposes you can use the VMware vSphere Mobile Watchlist app. Go to Apps & Books --> Applications --> Native and then navigate to the Public tab. Do a search for vSphere and you'll see a hit for the VMware vSphere Mobile Watchlist for iOS. Click on Assign.
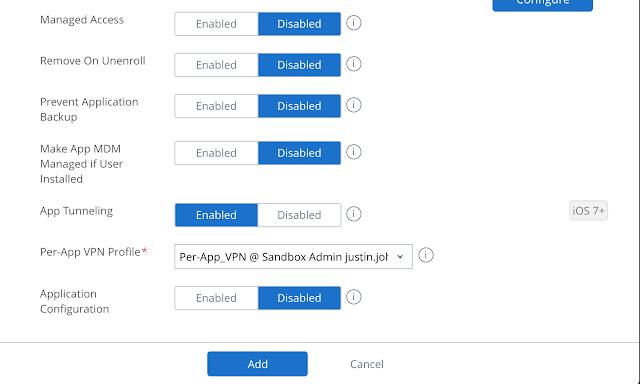
When configuring the assignment select Auto as the app delivery method. Scroll down and enable App Tunneling, selecting the Per-App VPN profile you've just created.
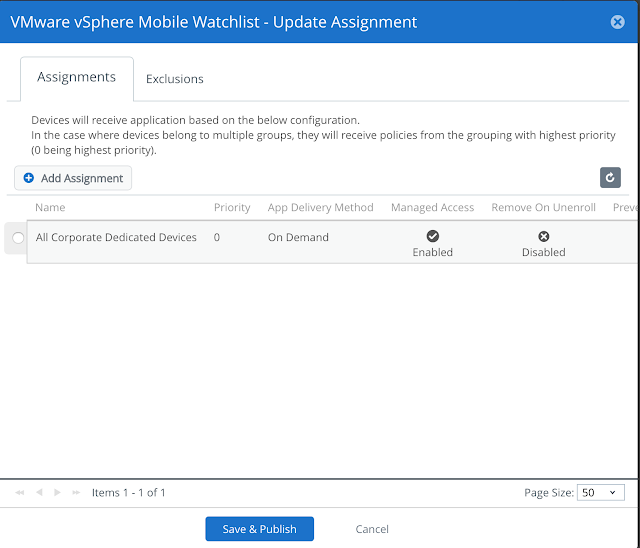
Then proceed with publishing this assignment.
At this point, the watchlist app will be deployed to your iOS device, configured to automatically leverage the VPN tunnel at execution.
After confirming the VPN profile and Watchlist app has been assigned and installed to your mobile device, you can test the solution out. Fire up the Watchlist app. Enter in a vCenter server along with login credentials.
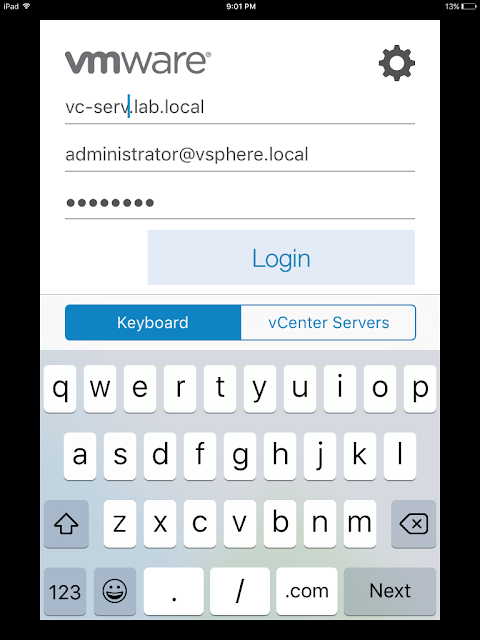
Upon successful login you'll have an option to select hosts or VMs from your vSphere environment.
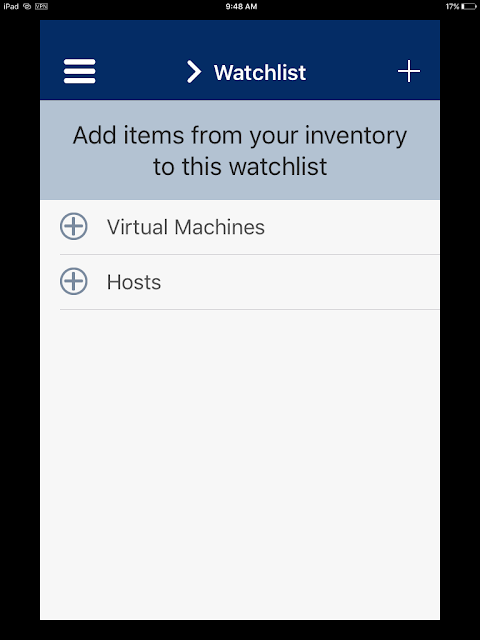
At this point, you already know your VPN tunnel is working, but for fun you can traverse through your vSphere environment a bit. (Note: In the App Store reviews there's a lot of haters of this app. I'm not saying it's the best thing since sliced bread. It certainly makes for a handy test app though.)
It's not necessary to launch the VMware Tunnel mobile app for the process to work, but if you do open up the app you get a display confirming current connectivity.

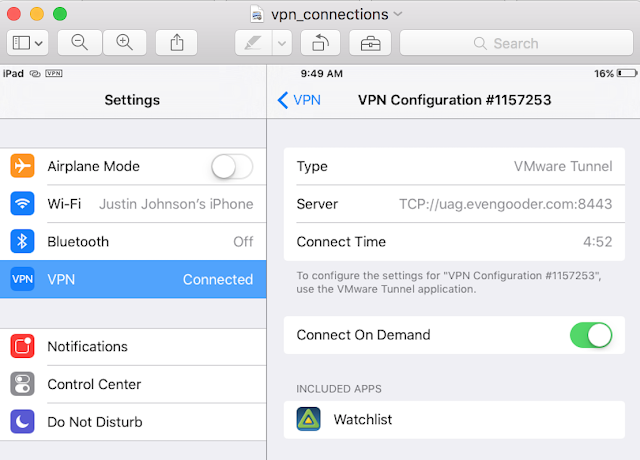
And if you navigate to settings on your iOS device and look at VPN, you'll see some additional confirmation the connection has been made.

When configuring the assignment select Auto as the app delivery method. Scroll down and enable App Tunneling, selecting the Per-App VPN profile you've just created.

Then proceed with publishing this assignment.

At this point, the watchlist app will be deployed to your iOS device, configured to automatically leverage the VPN tunnel at execution.
Testing It Out

Upon successful login you'll have an option to select hosts or VMs from your vSphere environment.

At this point, you already know your VPN tunnel is working, but for fun you can traverse through your vSphere environment a bit. (Note: In the App Store reviews there's a lot of haters of this app. I'm not saying it's the best thing since sliced bread. It certainly makes for a handy test app though.)
It's not necessary to launch the VMware Tunnel mobile app for the process to work, but if you do open up the app you get a display confirming current connectivity.

And if you navigate to settings on your iOS device and look at VPN, you'll see some additional confirmation the connection has been made.

Great instructions can you publish some stuff on how to set it up in Cascade Mode.
ReplyDeleteI would but I'm lazy and cascade mode isn't a very sexy feature to investigate in my lab. :)
ReplyDeleteOkay, here's a post on using Cascade Mode: http://www.evengooder.com/2019/02/uag-34-cascade-mode-deployment-for.htm
ReplyDeleteThis comment has been removed by a blog administrator.
ReplyDeleteThis comment has been removed by a blog administrator.
ReplyDelete