Thursday, October 26, 2017

Integrating Horizon 7.2 With Symantec VIP 9.8


Recently I helped integrate Horizon 7.2 with Symantec VIP 9.8 to provide RADIUS authentication for Horizon Apps.  The ultimate goal was to provide 2 factor authentication for remote connections coming through a UAG appliance in the DMZ.   While UAG 3.0 can integrate directly with a RADIUS server, we discovered we could provide 2FA THROUGH the UAG 3.0 appliance via a direct integration between the Symantec VIP Enterprise Gateway and our Horizon Connection server.   The whole setup looks something like this:


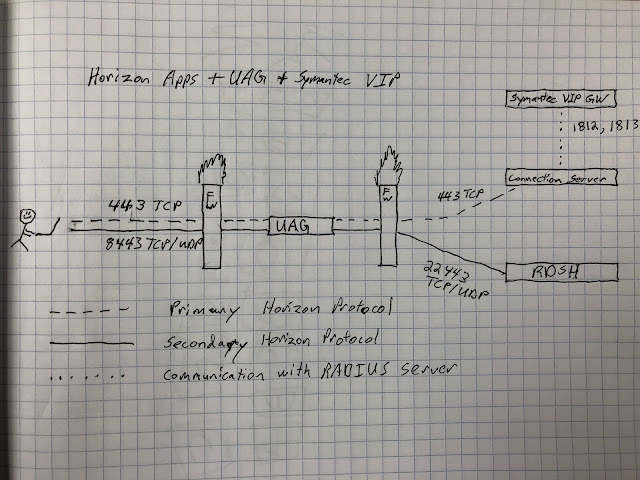
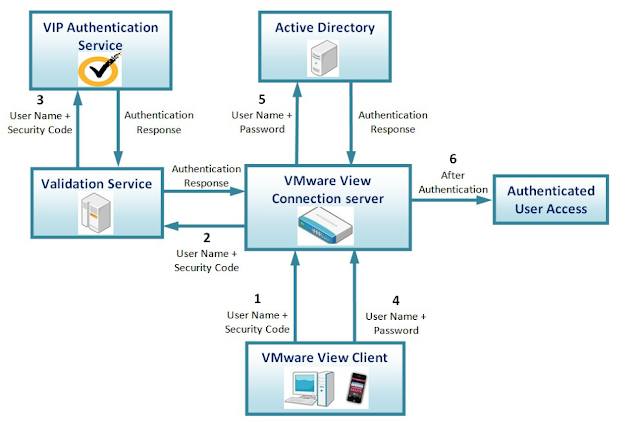
As you can tell from the incredibly professional drawing above choosing to integrate directly with the Connection server spared us the creation of additional firewall rules.  Further,  it provided us a well traveled path to Symantec VIP integration.  Support for RADIUS started with View 5.1 and includes a long list of vendors.   Plenty of folks have done it over the years.  In regard to Symantec VIP in particular,  an integration guide called the Symantec VIP Integration Guide for VMware   was put out in 2012.  Most of what this guide details still holds true today.   Below is an excellent graphic from the guide that illustrates the gist of how the integration works.


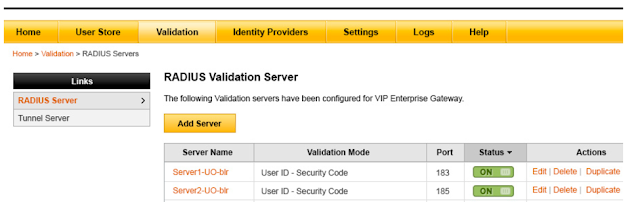
Now this guide was put out 5 years ago and details the integration between Horizon 5.1 and Symantec VIP 8.x.  Translating it for todays use involves working through a few changes in terminology.   First, in current Symantec documentation "authentication modes" are referred to as “validation modes.”   2nd, whereas the original guide says to setup the Symantec validation server in “User Name + Security Code,” mode, the modern equivalent of this in Symantec 9.8 is “User ID – Security Code.”   Once you account for this updated terminology, the process for integrating with Symantec VIP is the same as it was when the guide was put out 5 years ago.  Here's a sample screenshot of a Symantec VIP Enterprise Gateway Validation Server properly setup to provide radius authentication for a Horizon environment.  (For more info on how to setup the Symantec VIP Enterprise Gateway, check out this install and config guide.


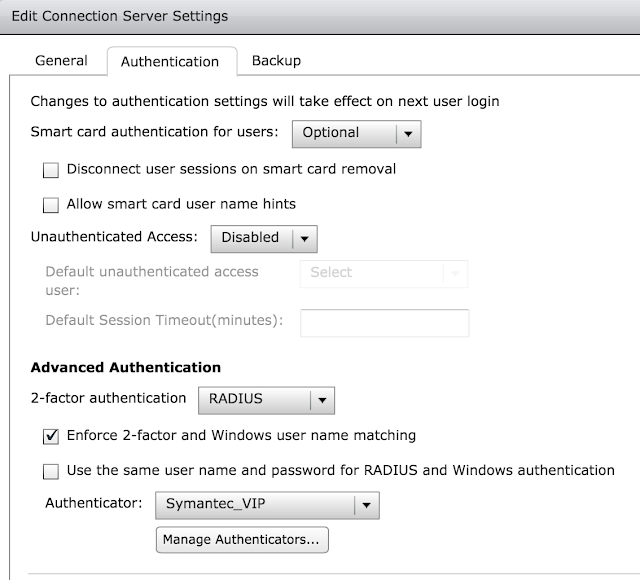
With a validation server setup properly the next step is to configure the Horizon Connection server itself.    So navigate to View Configuration > Servers > Connection servers.  Select the connection server you want to enable 2 factor authentication and navigate to it's authentication tab.   Select RADIUS for your two factor authentication option and select, "Create New Authenticator."


The process for creating the authenticator is identical to that detailed in the integration guide.   Here's a sample of what it looks like today:      


Finally, select this new authenticator and check the box, "Enforce 2-factor and Windows user name matching." 


At this point you should be all set.   When authenticating to this Connection server - whether directly or through the UAG appliance - you'll first get prompted for your passcode, then your normal AD credentials.

Wednesday, October 18, 2017

Monitor Instant Clone Image Updates For RDHS Farms With Horizon PowerCLI

Recently a friend of mine asked if there was an easy way to monitor progress of an Instant Clone maintenance task as it runs against an RDSH farm.   I thought this was rather silly of him till realizing there actually isn't an easy way track the progress within view administrator.  With Instant Clone DESKTOP pools there's a special, "Machine (InstanClone Details)," view under the Inventory tap for the pool.  It gives a very clear indication of what base images a particular Instant Clone desktop is working off of and where it stands relative to any scheduled pushes.  Here's an example of this visibility we normally enjoy with Instant Clone desktops:


However,  as of today there isn't a similar view available for Instant Clone farms for RDSH.  So I've put together a work around utilizing Horizon PowerCLI and the Active Directory module for PowerShell.   Using Horizon PowerCLI you can determine the RDS hosts associated with a specific farm.   Then, using the Active Directory module, you can connect to View LDAP directory to look up Instant Clone maintenance/image properties from LDAP objects that represent these RDS hosts.  This includes info similar to what's seen in the screen shot above.

A prerequisite for this script is an OS that's setup properly for Horizon PowerCLI and has the the VMware.Hv.Helper module imported. These blogs by Ray Heffer and Graeme Gordon will get you up to speed with these perquisites. Also, you'll need Active Directory Module for PowerShell, a process that's covered pretty well in this blog.

With the above prerequisites lined up you can get started with the script.   The entire script is included below along with sample screenshots from it's output.  If you just want to take a crack at the script change the variables at the very top of then have at it.  Otherwise, here's some details on how it works.

How It Works


First variables are populated with values for farm name and connection server. 

$farmName = "InstantFarm"
$connectionServer = "horizon.work.com"


Next, credentials are gathered for access to the Horizon API and View LDAP environment.  For the script to work it needs to be a user with administrator rights to the Horizon environment.


$cred = Get-Credential 


With the creds now in hand you can authenticate to the Horizon API and copy the global extension data to a variable for later use.

Connect-HVServer -server $connectionServer -Credential $cred
$Services1=$Global:DefaultHVServers.ExtensionData

Now you can access the View LDAP directory using New-PSDrive and the Active Directory provider. We're going to provide it the name of our connection server and "ou=Servers,DC=vdi, DC=vmware, DC=int" as the root.

New-PSDrive -Name ViewLDAP -PSProvider ActiveDirectory –Server ($connectionServer + ":389") -Root "ou=Servers,DC=vdi, DC=vmware, DC=int" -Credential $cred


With the new PSDrive created you can navigate your way into the directory with a simple CD command.

cd ViewLDAP: 

(For more information on the Active Directory module for PowerShell check out this page by Microsoft.)

With a successful connection to the View API and View LDAP directory you can start having some fun.  First, you can leverage the Get-HVFarmSummary advanced function to get the farm ID of the farm you wish to monitor.

$MySummary = Get-HVFarmSummary $farmName

You're then going to use this ID as a parameter for the FarmHealth_Get function associated with the FarmHealth service.  To simplify access to this service and it's functions, we'll use the View API Helper library to create an object for it.

$FarmHealth = New-Object VMware.Hv.FarmHealthService

Then take this new object and feed it the variable for the extension data along with the id for the farm.
 
$TestFarmHealth = $FarmHealth.FarmHealth_Get($Services1, $MySummary.id)


With $TestFarmHealth you now have a collection of objects representing the RDSH hosts.  You can then pull the Name property associated with each one of these objects and perform searches against the View LDAP directory accordingly using Get-ADobject.   Each matching directory object found will be appended to the $viewLDAPObjects variable.

$viewLDAPObjects = @()

ForEach ( $RDSHHost in ($TestFarmHealth.RdsServerHealth))
{
     $target = $RDSHHost.Name + "*"
     $rdsObject = Get-ADObject -Filter {ipHostNumber -like $target} -Properties pae-DisplayName, `       pae-SVIVmSnapShot, ipHostNumber, pae-SVIVmOperationStatus,`
     pae-VmCreated, pae-SVIVmParentVM

     $viewLDAPObjects += $rdsObject
}


Now the $viewLDAPObjects contains a collection of AD objects representing the RDSH VMs. Using FT we can neatly display the relevant properties of these objects that tell us about image update status.   You could do it with a line as simple as the one below. (The command in my script is bit messier for the sake of more readable output.)

$viewLDAPObjects | Ft pae-DisplayName, ipHostNumber, pae-SVIVmSnapShot, pae-SVIVmOperationStatus, pae-VmCreated

Example Output


This is what my farm looks like prior to a new image push.  Note that all VMs are using the same Parent VM and snapshot.


Now here's what it looks like after a new image push, with 2 systems not updated because users are still logged in.  Note the, "scheduled," maintenance status and older snap shots associated with these systems.


Here's what the output looks like with an additional server getting updated.


And finally, here's what it looks like after every single VM has been updated with the new image.


The Script: 


Friday, October 13, 2017

Creating Horizon Application Pools With PowerCLI

In a previous post I demonstrated how advanced functions provided by the VMware.Hv.Helper module allow you to create Instant Clone pools with Horizon PowerCLI.  Now I'd like to show how to get something done that's not already covered by these functions out of the box.

Since the VMware.Hv.Helper module doesn't include any functions for creating application pools I'm going to demonstrate how to create application pools using the ViewAPI documentation and View API Helper library.  (The View API Helper library is a wrapper over View APIs that makes life easier for PowerCLI developers.)  Looking through service types in the View API documentation I uncovered a service called application with a method called, "Application_Create," that accepts the object ApplicationSpec as an argument.


To easily take advantage of this application service and it's methods we use the View API Helper library to create an ApplicationService object as well a ApplicationSpec object that are easy to manipulate in PowerShell.   After updating the ApplicationSpec object with properties required for the Application_Create method we'll feed the method this ApplicaitonSpec object.

So, to begin with, we'll make a connection to the View API and assign the extension data to an easier to manage variable. 

Connect-HVServer -server view-connect.lab.local
$hzServices = $Global:DefaultHVServers.ExtensionData

Next, we can create an object for the application service by typing:

$application = New-Object VMware.Hv.ApplicationService

Before leverage the application_create method through this object, we'll create an ApplicationSpec object using the two lines below:

$appSpec = $application.getApplicationSpecHelper()
$AppPoolSpec = $appSpec.getDataObject()


Now we can begin populating the properties of this new object with the properties required for the application_create method to execute successfully.

$AppPoolSpec.Data.Name = 'Calculator'
$AppPoolSpec.Data.Description = "A pool for calculating "
$AppPoolSpec.Data.Enabled = $true
$AppPoolSpec.ExecutionData.ExecutablePath = '
c:\Windows\system32\calc.exe'

Next, we need to get the Farm ID of the farm we want to associate the pool with.  To do this we can use the Get-HVFarm advanced function:

$farm = Get-HVFarm "FarmName"
$AppPoolSpec.ExecutionData.Farm = $farm.Id

Finally, we can feed the application service object's method the variable for the global extension data  along with the now populated ApplicationSpec object.   

$application.Application_Create($hzServices, $AppPoolSpec)

And, voila!  You're application pool is created.


Now these were just the bare minimum required properties to make an application pool.  We could have specified additional properties such as parameters and start folders.   You can discover what's possible by looking at the API documentation.

For extra credit, you can go ahead and entitle users to this pool using New-HVEntitlement function:

New-HVEntitlement -ResourceName $AppPoolSpec.Data.Name -User 'lab\domain users' -ResourceType Application -Type Group

Below is a fast and loose sample script I put together that automates the creation of the farm, pool and entitlement.


Tuesday, October 3, 2017

Using PowerShell To Create And Manage Instant Clone Pools With Horizon PowerCLI


With Horizon PowerCLI the sky's the limit for folks looking to automate their Horizon 7 environments with PowerShell.  Horizon PowerCLI entails leveraging a Horizon 7 module built right into PowerCLI 6.5 R1 and provides Horizon admins with full access to the same View API that's used by the Horizon Administrator console.  So, theoretically, any tasks accomplished through the administrator console can now be automated through PowerShell.  This is a vast improvement over the very limited capabilities of View PowerCLI, which has been officially deprecated as of Horizon 7.0.3.  Further, by leveraging the advanced functions developed by the VMware Horizon 7 team, administrators gain simplified and instant access to some of these new PowerShell capabilities.  Even better, with a completely documented View API, anything not achievable with these advanced functions out of the box can be achieved with determination and elbow grease.


(What we're working with.  For more details check out this blog by Graeme Gordon.)

My favorite new capability offered by Horizon PowerCLI is Instant Clone pool management.  Using the advanced functions mentioned above I plan to demonstrate how Instant Clone pools can be managed with zero understanding of the View API.   Then I'll demonstrate how you can further augment this capability with just a little digging into the View API documentation. 

The processes detailed below assumes you have PowerCLI 6.5 R1 installed with the Horizon 7 module and VMware.Hv.Helper module imported.   For an excellent tutorial on these preliminary steps check out this blog post by Ray Heffer.  Once you complete the setup detailed in that post you should be good to go.

To get connected to the View API on your connection servers you leverage the Connect-HVServer cmdlet that's part of the Horizon 7 module.  Here's an example:

Connect-HVServer -server view-connect.lab.local -user administrator -password YoMama -domain lab

Now that we're connected, we can take advantage of the New-HVPool advanced function:

New-HVPool -InstantClone -PoolName "Insta-Gimme" -PoolDisplayName "Gimme Desktop" -Description "Virtual desktops for important people" -UserAssignment FLOATING -ParentVM 'Parent' -SnapshotVM 'R25' -VmFolder 'temp' -HostOrCluster 'LabCluster' -ResourcePool 'LabCluster' -NamingMethod PATTERN -NamingPattern "Gimme{n}" -Datastores 'Clones' -NetBiosName 'lab' -DomainAdmin administrator 


Below are the result of the function executing successfully.   


For an explanation of the parameters we provided to New-HVPool, you can use the same old PowerShell help commands you're normally used to running, so commands like help New-HVPool or help New-HVPool -examples will work for you.   Also, if you're using the PowerShell ISE, you easily browse and look up parameters for all the VMware.Hv.Helper functions using the commands explorer.


Next, we can leverage the New-HVEntitlement function to entitle domain users to this new pool.  In this example, we entitle domain users for the "lab" domain:

New-HVEntitlement -ResourceName 'Insta-Gimme' -User 'lab\domain users' -ResourceType Desktop -Type Group


We can also go on to schedule an Instant Clone push for after hours.  To do that we use the Start-HVPool function:

Start-HVPool -Pool Insta-Gimme -LogoffSetting WAIT_FOR_LOGOFF -ParentVM 'Parent' -SchedulePushImage -SnapshotVM R25 -StartTime '23:30' -StopOnFirstError $true


When we go back and look at the pool we can see that the image push has been schedule.


Next, we can use Set-HVPool to enable or disable the pool:

Set-HVPool -PoolName Insta-Gimme -Disable


Digging In Deeper Into The View API

Using Set-HVPool and the View API documentation, we can compensate for some short comings of the New-HVPool function.  After exploring New-HVPool more thoroughly it came to my attention it supports way less parameters for Instant Clones than for Linked Clones.  For instance, when using New-HVPool to create an instant clone there's no option for setting a default display protocol or for enabling HTML access.  That's okay though.  We can look up specific objects and properties within the View API documentation and then use Set-HVPool to update these objects accordingly. 

To begin with, to get more information about the new Instant Clone pool and what type of object it is, we'll use the Get-HVPool function.

$MyNewPool = Get-HVPool -PoolName Insta-Gimme

We can then use Get-Member to get more information about this pool object type.   


Based on the output we can see that the pool is of the object type DesktopInfo and that it's properties in turn are other objects.  To get more information about this object and it's child objects, we can go to the View API documentation and look it up.


This entry for DesktopInfo includes links to the child objects that make up it's properties.   Poking around these different objects, I discovered that it's DesktopSettings object contains DisplayProtocolSettings object, which in turn has a property for defaultdisplayprotocol.  This certainly looks promising.   To confirm the current value of this setting, I can leverage the $MyNewPool object once again. 

$MyPool.DesktopSettings.DisplayProtocolSettings.DefaultDisplayProtocol 


This jives with what I see in the view administrator console.   Looking at the View API documentation for the DisplayProtocolSettings object, I can see that possible values for the DefaultDisplayProtocol property are RDP, PCOIP and BLAST.    With this info in hand I go on to leverage the Set-HVPool function to change the default protocol.    

Set-HVPool -PoolName Insta-Gimme -Key "desktopSettings.displayProtocolSettings.defaultDisplayProtocol" -Value "BLAST"


Examples of other pool properties we can set our using Set-HVPool are enabling HTML access or increasing the max number of machines.   

Set-HVPool -PoolName InstaGime2 -Key "desktopSettings.displayProtocolSettings.enableHTMLAccess" -Value $true

Set-HVPool -PoolName Insta-Gimme -Key "automatedDesktopData.vmNamingSettings.patternNamingSettings.maxNumberOfMachines" -Value 3


Note: At least in my own environment, the -Key parameter above is case sensitive, with every member name starting with a lowercase.   For example, if I were to try and run the above command with a capital A for the "AutomatedDesktopData" member, I get an error message about an invalid member name.  See the example below.


Conclusion

So, this has been an intro into how to get dangerous with Horizon PowerCLI.   In the future I plan to publish an additional post about using the View API Helper library to get more creative.  If you're looking for additional resources on what was covered in this post, here's the good stuff:

Automating VMware Horizon 7 with VMware PowerCLI 6.5 
Quick Guide To The Horizon 7 API With VMware PowerCL
View API 7.1.0
Horizon View API Review by Simon Long