While looking for a free RADIUS solution for my VMware Horizon lab I came across this white paper, "How To Setup 2-Factor Authentication In Horizon View With Google Authenticator." While I was able to stand up the solution detailed in this white paper, holly cow, it was a lot of work. Between the Ubuntu administration, the version changes and name changes, it was pretty rough. So I documented my entire setup process and put together this updated guide. I think a typical VDI admin could stand this solution up in an hour or two by following this procedure, assuming they had all the required access rights and resources lined up.
Here's a basic outline of the steps required to integrate Google Authenticator with VMware Horizon through FreeRADIUS. Further below are the detailed procedures.
Ubuntu Setup
Install Ubuntu Desktop 16.04 in VM
Update Ubuntu image and prepare for domain membership
Join system to domain with PowerBroker Identity Services Open (PBISO)
Setup Google Authenticator
Install Google Authenticator
Integrate with OpenSSH (Optional)
Setup FreeRADIUS
Install FreeRADIUS
Integrate FreeRADIUS with Google Authenticator
Horizon Integration
Create Client Entry On RADIUS Server
Configure Connection Server as RADIUS client
Configure UAG as RADIUS client
Brief Overview
Ubuntu is used to run an open source RADIUS solution, FreeRADIUS. This instance of FreeRADIUS is integrated with a local install of Google Authenticator, then configured to act as a RADIUS server for a Horizon Connection server. The end result is two-factor authentication for our Horizon environment for free. Directly below is an excellent graphic that represents how Google Authenticator works. Then below that is my own rendition of what the entire integration with VMware Horizon and UAG looks like. |
| https://linuxscriptshub.com/secure-with-google-authenticator-two-factor-authentication/ |
Putting It All Together:
Ubuntu Setup
Install Ubuntu Desktop 16.04 In VM
Download Ubuntu Desktop 16.04 from here: https://www.ubuntu.com/download/desktop (Most recently, I downloaded 16.04.4-desktop-amd64.iso.)
Upload the ISO to a shared storage location easily accessible from the VM you're creating.
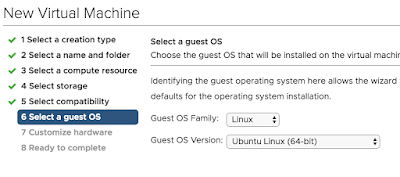
With the vSphere Web Client create a new VM in a location that's appropriate. When it comes time to select a a guest OS type go with Linux, Ubuntu Linux (64-bit).
In terms of basic specs for the VM, go with 2vCPU, 2 gigs of RAM and 16 gigs of space.
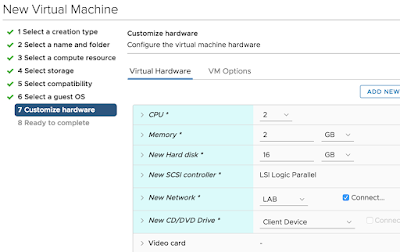
Most importatnly, configure the VMs CD rom to point to the Ubuntu ISO and ensure it's configured to, "Connect At Power On." You're going to boot from that ISO to proceed with the upgrade of Ubuntu. If everything goes properly, at power on you'll see the Ubuntu welcome menu within the newly created VM.
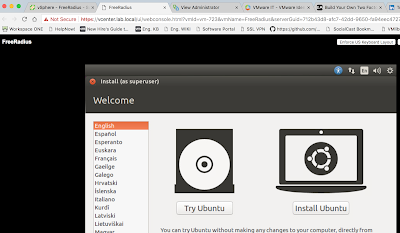
Proceed with the, "Install Ubuntu," option. Walk through the wizard, selecting keyboard type and time zone. Chose to go with "Erase disk and install Ubuntu," as the installation type.

Finally, the hardest part of the setup. Give the computer a name and setup your admin account. Stick with the option, "Require my password to login."
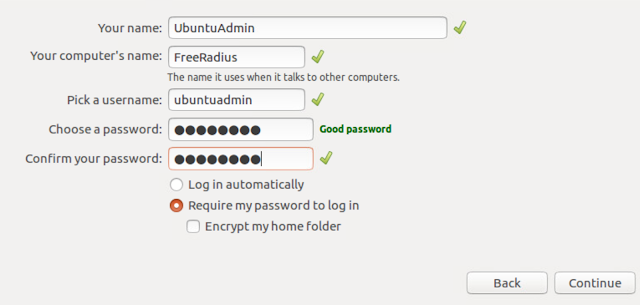
At this point, the wizard complets and you've got your Ubuntu OS installed.
Updating The Image
sudo apt-get update
sudo apt-get dist-upgrade
Then, install vmware tools with:
sudo apt-get install open-vm-tools
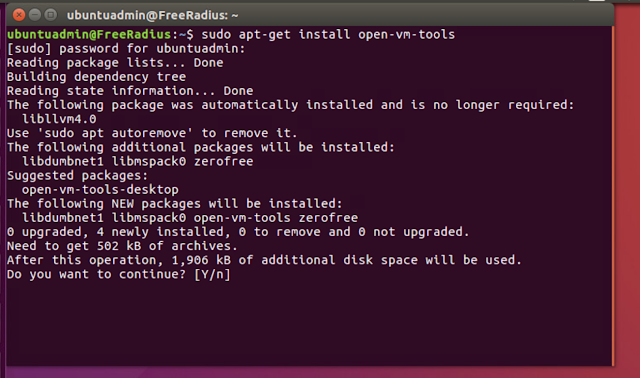
Next, install NTP with:
sudo apt-get install ntp
Finally, while we're at it, we can setup OpenSSH as well.
sudo apt-get install openssh-server
Preparing For Domain Membership
To enable domain membership we need to confirm that networking and DNS is all sorted out. To that end, it's a good idea to assign a static IP address to our new system and manually create a DNS record for it. From there we can use ping and nslookup to ensure everything's straight.
You can configure a static IP address using the Edit Connections option at right hand corner of screen.
From there you enter in the specifics of this network connection. Here's what the system in my lab looks like:
Click save and disable\enable the nic for the new settings to kick in.
Upon initial setup in my own lab I ran across a really strange DNS issue. While I was able to ping domain members by their short name, for some reason DNS resolution of the FDQN was failing. Here's an example.
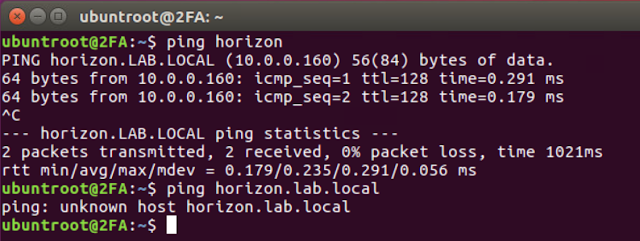
I was able to get this issue resolved by editing /etc/nsswitch.conf, changing the hosts: line so that it includes only files and DNS.
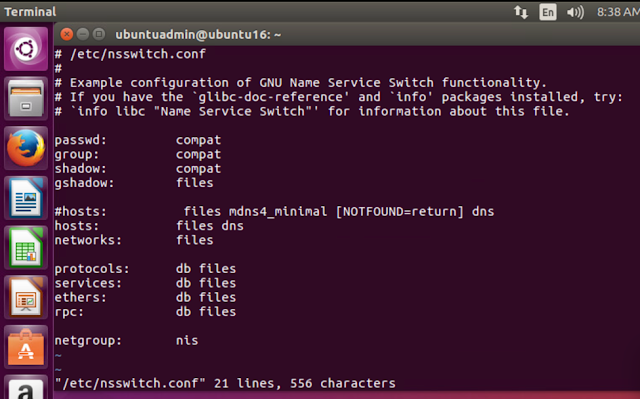
After making this change the FQDN started resolving properly.
Along with testing network connectivity and DNS resolution from the Ubuntu system to all relevant systems in the domain, I would also confirm that the domain controller you're going to join can ping and resolve the Ubuntu system.
Finally, for extra credit, I would use nslookup on Ubuntu to confirm that a lookup against the target domain yields the addresses of domain controllers.
nslookup domain_name
Joining Ubuntu To Active Directory
chmod +x pbis-open-8.5.3.293.linux.x86_64.deb.sh
sudo ./pbis-open-8.5.3.293.linux.x86_64.deb.sh
At this point, with power broker installed, you can proceed with adding the system to the domain using domainjoin-cli. Here's the syntax:
sudo domainjoin-cli join [DomainName [DomainAccount]
So, to join my lab's domain, lab.local, I executed the following:
sudo domainjoin-cli join lab.local justin@lab.local
After successfully joining system to domain, you'll see an account for it in AD:
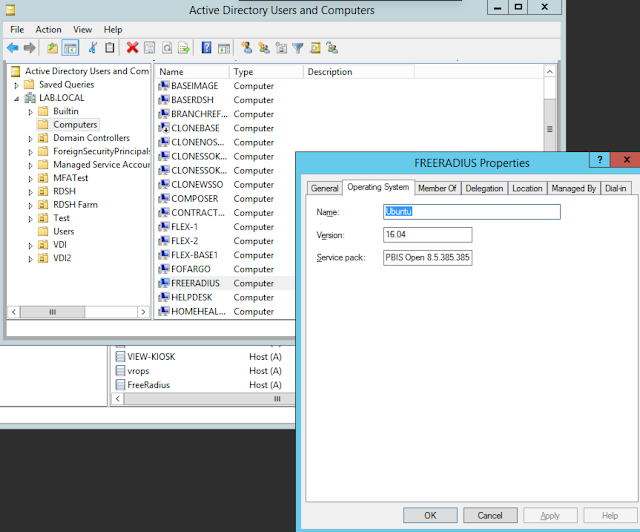
After a reboot of your system you now have the option to login with a domain account over SSH.
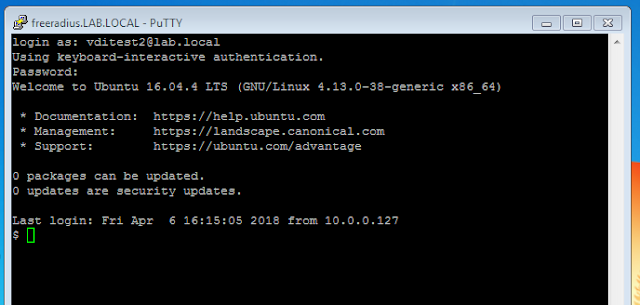
It's typically suggested that you setup default configuration for domain users by running special commands for PowerBroker. Here's the syntax:
sudo /opt/pbis/bin/config AssumeDefaultDomain true
sudo /opt/pbis/bin/config LoginShellTemplate /bin/bash
sudo /opt/pbis/bin/config HomeDirTemplate %H/%U
sudo /opt/pbis/bin/config UserDomainPrefix SHORT_DOMAIN_NAME

Finally, you need to add the following lines to /usr/share/lightdm/lightdm.conf.d/50-unity-greeter.conf:
allow-guest=false
greeter-show-manual-login=true
After adding these entries to 50-unity-greeter.conf and rebooting you can login with your AD credentials directly through the Ubuntu login screen.
Setting Up Google Authenticator
To setup Google Authenticator on your Ubuntu system, type:
sudo apt install libpam-google-authenticator
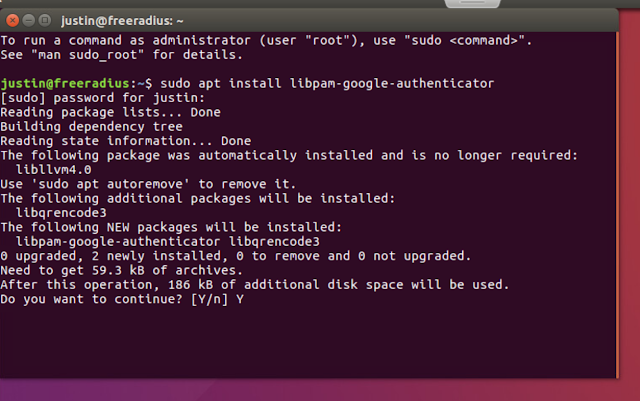
At this point, you can begin enrolling users who have the Google Authenticator mobile app on their phones. They should be able to download the app from their device manufacturers app store.
On the ubuntu system login as root. Then use su to switch to whatever user you want to enroll, and run "google-authenticator," under their context.
su domain_user_you_wish_to_enroll
google-authenticator
You'll initially be prompted if you want tokens to be time based. Select yes. Afterwards, a QR code will be displayed.
Now, open up Google Authenticator and select begin, choosing the Scan barcode option,
Position the green box overlay over the QR code.
When your scanner captures the QR code, the authenticator app flashes and you see a new entry for the user being enrolled. (For extra credit and some healthy fun, if you have Google Authenticator setup on your phone, try scanning the QR code of the image above. You'll have the expired key of vditest@freeradius.)
After successfully scanning from your phone, ensure you complete the wizard on your system to complete the users enrollment. I usually answer y, y, y, n.
Add the entry, "auth required pam_google_authenticator.so", to end of the file, /etc/pam.d/sshd. So:
sudo apt install libpam-google-authenticator

At this point, you can begin enrolling users who have the Google Authenticator mobile app on their phones. They should be able to download the app from their device manufacturers app store.
On the ubuntu system login as root. Then use su to switch to whatever user you want to enroll, and run "google-authenticator," under their context.
su domain_user_you_wish_to_enroll
google-authenticator
You'll initially be prompted if you want tokens to be time based. Select yes. Afterwards, a QR code will be displayed.
Now, open up Google Authenticator and select begin, choosing the Scan barcode option,
Position the green box overlay over the QR code.
When your scanner captures the QR code, the authenticator app flashes and you see a new entry for the user being enrolled. (For extra credit and some healthy fun, if you have Google Authenticator setup on your phone, try scanning the QR code of the image above. You'll have the expired key of vditest@freeradius.)
After successfully scanning from your phone, ensure you complete the wizard on your system to complete the users enrollment. I usually answer y, y, y, n.
Integrating Google Authenticator With OpenSSH
sudo vi /etc/pam.d/sshd
And add:
auth required pam_google_authenticator.so
(Note: For all the editing in my environment I use vi because I'm relatively comfortable with it. You could just as well use nano.)
After making the edits above, we can now test using ssh. Taking that ubuntutest account we enrolled earlier, I ssh into the box and at first receive a prompt for my normal AD password. After entering in my password, I'm prompted for my verification code.
Looking at Google Authenticator I see the current verification code associated with the ubuntutest account. After plugging that code in I'm successfully logged in over SSH.
Now we know that Google Authenticator is working on the system and we can move on to standing up FreeRADIUS.
Setup FreeRADIUS
To install FreeRadius, the command is:
sudo apt-get install freeradius
Say yes to the continue prompt and let the install complete.
Next, we have to make an edit to /etc/freeradius/radiusd.conf. Where it says:
users = freerad
group = freerad
Replace freerad with root, so that it looks like:
Finally, we need to make an edit to /etc/pam.d/radiusd. We need to comment out all the @include lines, and then add the following two lines:
auth requisite pam_google_authenticator.so forward_pass
Finally, for easier troubleshooting, I enable additional logging by making edits to the /etc/freeradius/radiusd.conf under the log { directive. These include
auth = yes
auth_badpass = yes
auth_goodpass = yes
Restart the radius server for these changes to take affect.
service freeradius restart
Restart FreeRADIUS after making this change
service freeradius restart
Next, you need setup the Horizon Connection server to connect to the RADIUS server as a client. Go to View Configuration --> Servers --> Connection Servers --> Select-Your-Connection-Server-And-Edit --> Authentication tab.
Then select the option to Add an Authenticator. Here we're going to configure the RADIUS client settings that will be used by the Horizon Connection server to make request from the FreeRADIUS server. The basic settings required are a label, hostname, authentication port, accounting port and authentication type. For this solution we need to choose PAP as the authentication type and go with 1812 for the authentication port and 1813 for the accounting port. The shared secret is whatever has been configured in the FreeRADIUS clients.conf.
Click next and hit okay.
With the wizard complete, ensure your new authenticator is selected, and also ensure you check option for user matching.
At this point you're good to go. Fire up the Horizon View client. For your passcode take your normal AD password and then append your Google Authenticator code to it. Here's a great graphic that details the format:Next, we have to make an edit to /etc/freeradius/radiusd.conf. Where it says:
users = freerad
group = freerad
Replace freerad with root, so that it looks like:
Next, we need to make an edit to /etc/freeradius/users. We need to add the line:
DEFAULT Auth-Type := PAM
DEFAULT Auth-Type := PAM
Next, we need to make an edit to /etc/freeradius/sites-enabled/default to enable PAM. Simply uncomment out the line #PAM, so that PAM is enabled.
Finally, we need to make an edit to /etc/pam.d/radiusd. We need to comment out all the @include lines, and then add the following two lines:
auth requisite pam_google_authenticator.so forward_pass
account required pam_unix.so use_first_pass
Finally, for easier troubleshooting, I enable additional logging by making edits to the /etc/freeradius/radiusd.conf under the log { directive. These include
auth = yes
auth_badpass = yes
auth_goodpass = yes
Restart the radius server for these changes to take affect.
service freeradius restart
Horizon Integration
For the integration with Horizon, we have two steps. First, we must configure a radius client entry for the Horizon connection server on the RADIUS server. In my environment, the Connection server is accessible from horizon.lab.local, so I've configured this section of the /etc/freeradius/clients.conf accordingly. Heres's a screen shot:
Restart FreeRADIUS after making this change
service freeradius restart
Next, you need setup the Horizon Connection server to connect to the RADIUS server as a client. Go to View Configuration --> Servers --> Connection Servers --> Select-Your-Connection-Server-And-Edit --> Authentication tab.
Then select the option to Add an Authenticator. Here we're going to configure the RADIUS client settings that will be used by the Horizon Connection server to make request from the FreeRADIUS server. The basic settings required are a label, hostname, authentication port, accounting port and authentication type. For this solution we need to choose PAP as the authentication type and go with 1812 for the authentication port and 1813 for the accounting port. The shared secret is whatever has been configured in the FreeRADIUS clients.conf.
Click next and hit okay.
With the wizard complete, ensure your new authenticator is selected, and also ensure you check option for user matching.
Below is what the initial login to my lab environment looks like. I enter in my password with a 6 digit authenticator code appended to it.
Then I get the traditional Horizon credential prompt. You simply type in your normal AD password at this 2nd prompt.
And you're in.
Integrating With UAG
Integrating UAG with with FreeRADIUS isn't much different than integrating a traditional Horizon Connection server. First, you create an appropriate RADIUS client entry with FreeRADIUS clients.conf, just as we did earlier for the Horizon Connection server. Then login to admin gui of UAG. After the initial login, choose the option for Configure Manual.
Then under general settings, expand out and select the gear icon for RADIUS.
At this point, we're going to populate the same basic info we did on the connection server, RADIUS server name, shared secret, etc..
After populating all the info required for Horizon to issue requests to the RADIUS server as a RADIUS client, you're up and running.


