
Note: For more security minded folks there's a Relay-Endpoint deployment option involving 2 UAG appliances that's an option. Additional info is available here: https://docs.vmware.com/en/VMware-Workspace-ONE-UEM/9.5/vmware-airwatch-guides-95/GUID-AW95-CG_Arch_RelayEnd.html
The first step is to configure a content gateway node from the Workspace One UEM Console. (Workspace One UEM is the artist formerly known as AirWatch.) Then you deploy UAG and configure it through the Content Gateway edge services settings. Once that's successfully completed you can begin to configure access to the CIFS share through the creation of an admin repository. This admin repository is then accessed by remote users from within Content Locker, with UAG acting as a gateway between these external users and this admin repository sitting within the trusted network.
So, you'll definitely need a Workspace One UEM (AirWatch) instance. For this post I leveraged a free eval Workspace One UEM instance at vmwdemo.com. You're certainly going to need a UAG appliance that's externally accessible over port 443. The UAG appliance itself, in Basic mode, will need access to port 445 on whatever server your CIFS share is set up on. The UAG appliance must have a DNS address that resolves to a an accessible IP address. Finally, you'll need a valid public SSL cert on the UAG appliance.
The Dreaded SSL Certificate Requirement
Unlike a deployment of VMware Tunnel on UAG, you absolutely need a valid SSL certificate for a UAG appliance acting as a Content Gateway. Further, you'll need a PFX version of it, including root chain and private key, that you'll later provide to the Content Gateway node creation wizard. If you have a solid process available for creating publicly trusted certs for your domain, awesome possum, go with that. If you have a wild card cert in PFX format, hell yeah, you're in business. For my implementation I used a free SSL cert from Comodo. So long has you have a valid domain registered, Comodo will provide you a single SSL cert for free that's valid for 3 months. After generating a CSR request through an IIS server, I submitted the request to Comodo and received the SSL cert, intermediate and root certs. I combined these into a PEM, obtained the private key generated with the initial CSR request on the IIS server, then combined the two into a pfx cert using the following openssl command:
openssl pkcs12 -inkey Request_w_private_key.key -in uag_evengooder_full_chain.pem -export -out even_gooder.pfx

If you're looking for additional details on this process, here's some helpful links:
Getting A Free Cert:
https://www.comodo.com/e-commerce/ssl-certificates/free-ssl-certificate.php
Creating A PEM:
https://ssl.comodo.com/support/creating-a-pem-file.php
On the Workspace One UEM Console go to Groups And Settings --> All Settings --> Content --> Content Gateway. There you'll have an option to enable Content Gateway and add a Content Gateway node. Select Linux as the installation type. Enter in a descriptive name and provide the publicly resolvable DNS address of your UAG appliance. Finally, upload the pfx SSL certificate for your appliance by clicking the upload button.

After successful completion you'll see the new instance show up under Content Gateway.

Of particular interest is the GUID for this instance that's visible when you scroll to the right. We'll later use this info when we configure the Content Gateway settings on the UAG appliance.

For the official documentation on this wizard check this out:
https://docs.vmware.com/en/VMware-Workspace-ONE-UEM/9.5/vmware-airwatch-guides-95/GUID-AW95-CG_Config.html
The simplest way to initially deploy and configure UAG is through the vSphere Web Client OVF deployment wizard and the gui on the UAG appliance itself. You can download the UAG 3.3 appliance here from My VMware.
After downloading the UAG appliance fire up the vSphere Web Client and launch the Deploy OVF Template wizard.
When prompted browse to the UAG ova download and click next.
Provide a VM name for the appliance and select next.
Select a host or cluster for the appliance and select next.
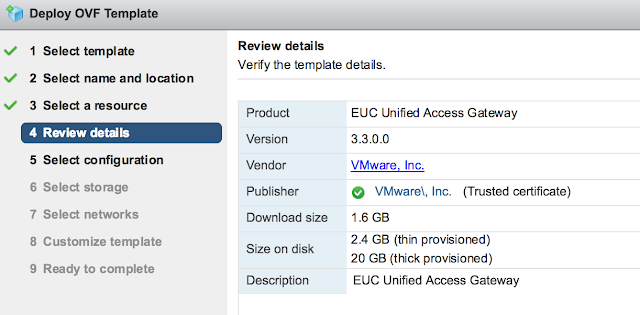
Review the details of the deployment and select next.
You'll be provided with an option of choosing between 1 to 3 nics for the appliance. For a POC or LAB go with a single nic.

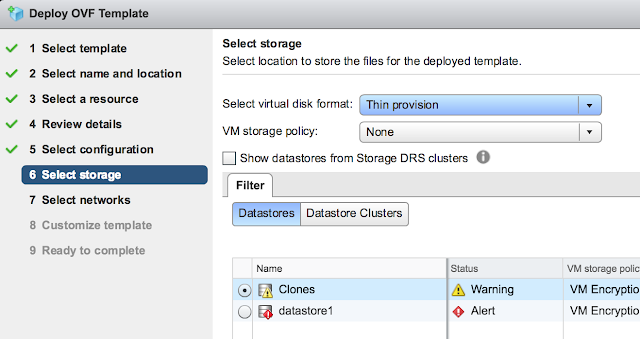
For storage, select the storage that screams at you the least and go with Thin provision.
Confirm the virtual networks to leverage for the different types of traffic.

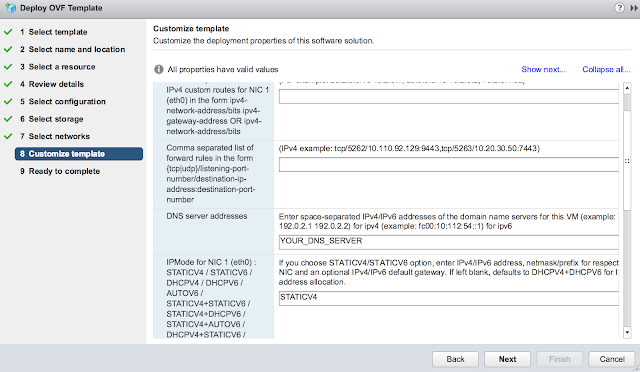
Finally, for the most exciting part of the deployment, the customize template dialog. First off, disable CIEP because you're selfish. Minimize it and get started on the network properties. Skip the first two options about custom routes and forwarding rules. Enter in your DNS server(s) and the appropriate IPMode. (Most likely STATICV4)
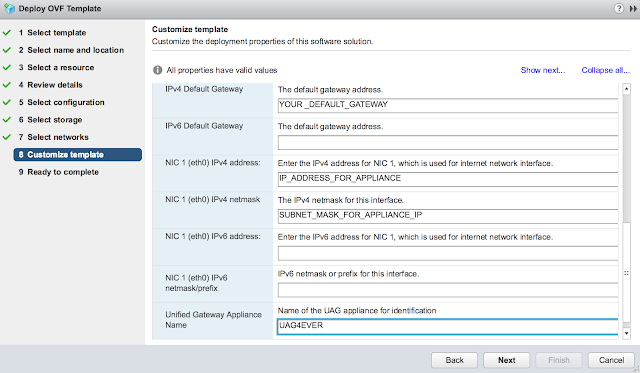
Scroll down further and enter in a default gateway, IP address and subnet mask for the primary nic. Also, enter in hostname for the appliance.
Finally, expand the password options section. Enter in passwords for the admin account and root account.

Confirm all your options and select finish.

Power on your VM once the deployment's complete.
For additional details and guidance on UAG deployments, check out this excellent blog: http://www.carlstalhood.com/vmware-access-point/

For the, "API Server URL," enter in the console URL for your Workspace One UEM instance. For the, "API Server Username," and, "API Server Password," provide the credentials of an admin user for your Workspace One UEM environment. For the, "Content Gateway Hostname," use the hostname you entered in earlier as a Content Gateway Endpoint Address in the Content Gateway configuration wizard . Finally, enter in the GUID that was created for your node upon completion of the Content Gateway configuration wizard.

After about 30 seconds you'll see if the settings have been successfully implemented by the presence of a green radial button.

If there was a misconfiguration you'd see a JSON mapping error message, find that the radial button was red or that the service just didn't start. (A wrong password will lead your settings to just not stick, and a minute later it will appear as if you never configured the Content Gateway settings.)
Now, to test the connection from Workspace One UEM to the UAG appliance, in the Workspace One UEM console navigate back to Content Gateway under Enterprise Integration. Click on, "Test Connection."

If things go well, you'll see something like:

For official guidance on this configuration, check this out: https://docs.vmware.com/en/Unified-Access-Gateway/3.3/com.vmware.uag-33-deploy-config.doc/GUID-F64DF3CA-AB68-4F14-9FE0-E8D9C6DA2377.html
Next, we add the CIFS share as an admin repository. Navigate to Content --> Repositories --> Admin Repositories. Click the Add button. Give it a descriptive name and select, "Network Share," as the Type. Enter in the UNC path to the CIFS share as a link. Be sure to check the box for, "Access via Content Gateway," and choose the node you've just created.

Under security, place a check box next to, "Allow Edit," and then select save.
Also, if you don't have one already, you may also have to create an automatic template under Content --> Repositories for your users to add this admin repository. For more info on templates, check this out:
https://docs.vmware.com/en/VMware-AirWatch/9.3/Mobile%20Content%20Management%20Guide.pdf
Further, here's some official guidance on the creation of an admin repository.
https://docs.vmware.com/en/VMware-Workspace-ONE-UEM/9.5/vmware-airwatch-guides-95/GUID-AW95-Repo_CFS_Sync.html
Go to Apps and Books --> Applications --> Native. Click on add application. Choose Apple iOS as the platform, then do a search against, "content locker."

Select VMware Content Locker.


Click Save and Assign. Click on the Add Assignment option.

Select an appropriate assignment group and go with Auto for the delivery method.

Go ahead and enable "Make App MDM managed if User Installed,"

Save and publish the assignment. Now Content Locker will be pushed out to your assigned devices when they check in.

High Level Outline And Summary:
- Configure A Content Gateway Node On The Workspace One UEM (AirWatch) Console
- Deploy Unified Access Gateway
- Configure Content Gateway Settings On Unified Access Gateway
- Create An Admin Repository
- Push out Content Locker
- Add Repository To Content Locker
The first step is to configure a content gateway node from the Workspace One UEM Console. (Workspace One UEM is the artist formerly known as AirWatch.) Then you deploy UAG and configure it through the Content Gateway edge services settings. Once that's successfully completed you can begin to configure access to the CIFS share through the creation of an admin repository. This admin repository is then accessed by remote users from within Content Locker, with UAG acting as a gateway between these external users and this admin repository sitting within the trusted network.
Prerequisites:
- Workspace One UEM Environment
- Publicly Resolvable DNS Address On UAG Appliance
- Publicly Trusted SSL Cert In PFX Format For UAG Appliance
- UAG Appliance
- Port 443 Open To World On External Interface Of UAG Appliance
- Port 445 Open On CIFS Host From UAG Appliance
So, you'll definitely need a Workspace One UEM (AirWatch) instance. For this post I leveraged a free eval Workspace One UEM instance at vmwdemo.com. You're certainly going to need a UAG appliance that's externally accessible over port 443. The UAG appliance itself, in Basic mode, will need access to port 445 on whatever server your CIFS share is set up on. The UAG appliance must have a DNS address that resolves to a an accessible IP address. Finally, you'll need a valid public SSL cert on the UAG appliance.
The Dreaded SSL Certificate Requirement
Unlike a deployment of VMware Tunnel on UAG, you absolutely need a valid SSL certificate for a UAG appliance acting as a Content Gateway. Further, you'll need a PFX version of it, including root chain and private key, that you'll later provide to the Content Gateway node creation wizard. If you have a solid process available for creating publicly trusted certs for your domain, awesome possum, go with that. If you have a wild card cert in PFX format, hell yeah, you're in business. For my implementation I used a free SSL cert from Comodo. So long has you have a valid domain registered, Comodo will provide you a single SSL cert for free that's valid for 3 months. After generating a CSR request through an IIS server, I submitted the request to Comodo and received the SSL cert, intermediate and root certs. I combined these into a PEM, obtained the private key generated with the initial CSR request on the IIS server, then combined the two into a pfx cert using the following openssl command:
openssl pkcs12 -inkey Request_w_private_key.key -in uag_evengooder_full_chain.pem -export -out even_gooder.pfx

If you're looking for additional details on this process, here's some helpful links:
Getting A Free Cert:
https://www.comodo.com/e-commerce/ssl-certificates/free-ssl-certificate.php
Creating A PEM:
https://ssl.comodo.com/support/creating-a-pem-file.php
Configure A Content Gateway Node On The Workspace One UEM Console
On the Workspace One UEM Console go to Groups And Settings --> All Settings --> Content --> Content Gateway. There you'll have an option to enable Content Gateway and add a Content Gateway node. Select Linux as the installation type. Enter in a descriptive name and provide the publicly resolvable DNS address of your UAG appliance. Finally, upload the pfx SSL certificate for your appliance by clicking the upload button.

After successful completion you'll see the new instance show up under Content Gateway.

Of particular interest is the GUID for this instance that's visible when you scroll to the right. We'll later use this info when we configure the Content Gateway settings on the UAG appliance.

For the official documentation on this wizard check this out:
https://docs.vmware.com/en/VMware-Workspace-ONE-UEM/9.5/vmware-airwatch-guides-95/GUID-AW95-CG_Config.html
Deploy Unified Access Gateway
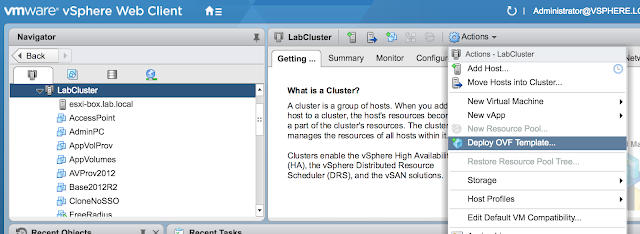
The simplest way to initially deploy and configure UAG is through the vSphere Web Client OVF deployment wizard and the gui on the UAG appliance itself. You can download the UAG 3.3 appliance here from My VMware.
After downloading the UAG appliance fire up the vSphere Web Client and launch the Deploy OVF Template wizard.

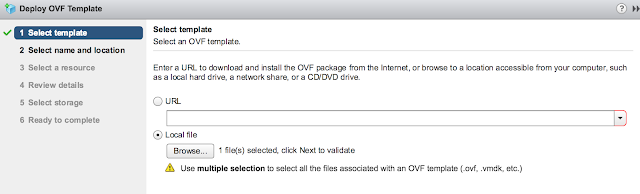
When prompted browse to the UAG ova download and click next.

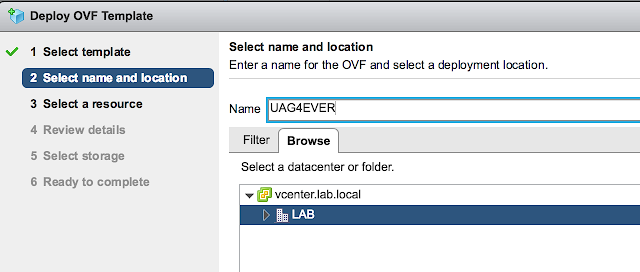
Provide a VM name for the appliance and select next.

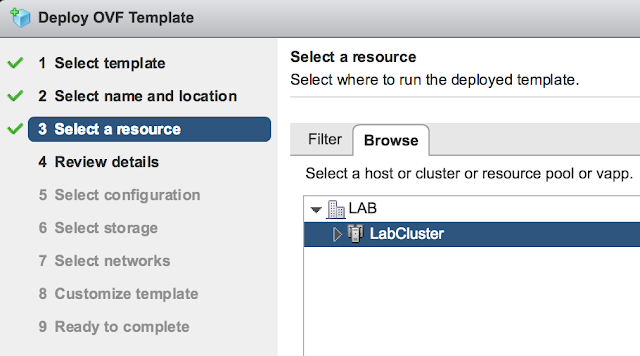
Select a host or cluster for the appliance and select next.

Review the details of the deployment and select next.

You'll be provided with an option of choosing between 1 to 3 nics for the appliance. For a POC or LAB go with a single nic.

For storage, select the storage that screams at you the least and go with Thin provision.

Confirm the virtual networks to leverage for the different types of traffic.

Finally, for the most exciting part of the deployment, the customize template dialog. First off, disable CIEP because you're selfish. Minimize it and get started on the network properties. Skip the first two options about custom routes and forwarding rules. Enter in your DNS server(s) and the appropriate IPMode. (Most likely STATICV4)

Scroll down further and enter in a default gateway, IP address and subnet mask for the primary nic. Also, enter in hostname for the appliance.

Finally, expand the password options section. Enter in passwords for the admin account and root account.

Confirm all your options and select finish.

Power on your VM once the deployment's complete.
For additional details and guidance on UAG deployments, check out this excellent blog: http://www.carlstalhood.com/vmware-access-point/
Configure Content Gateway Settings On Unified Access Gateway
After deploying UAG successfully, the next step is to enable and configure the Content Gateway. Log into the appliance over the web interface then, under Edge Service Settings, select the gear icon for Content Gateway Settings.


After about 30 seconds you'll see if the settings have been successfully implemented by the presence of a green radial button.

If there was a misconfiguration you'd see a JSON mapping error message, find that the radial button was red or that the service just didn't start. (A wrong password will lead your settings to just not stick, and a minute later it will appear as if you never configured the Content Gateway settings.)
Now, to test the connection from Workspace One UEM to the UAG appliance, in the Workspace One UEM console navigate back to Content Gateway under Enterprise Integration. Click on, "Test Connection."

If things go well, you'll see something like:

For official guidance on this configuration, check this out: https://docs.vmware.com/en/Unified-Access-Gateway/3.3/com.vmware.uag-33-deploy-config.doc/GUID-F64DF3CA-AB68-4F14-9FE0-E8D9C6DA2377.html
Create An Admin Repository
Next, we add the CIFS share as an admin repository. Navigate to Content --> Repositories --> Admin Repositories. Click the Add button. Give it a descriptive name and select, "Network Share," as the Type. Enter in the UNC path to the CIFS share as a link. Be sure to check the box for, "Access via Content Gateway," and choose the node you've just created.

Under security, place a check box next to, "Allow Edit," and then select save.
Also, if you don't have one already, you may also have to create an automatic template under Content --> Repositories for your users to add this admin repository. For more info on templates, check this out:
https://docs.vmware.com/en/VMware-AirWatch/9.3/Mobile%20Content%20Management%20Guide.pdf
Further, here's some official guidance on the creation of an admin repository.
https://docs.vmware.com/en/VMware-Workspace-ONE-UEM/9.5/vmware-airwatch-guides-95/GUID-AW95-Repo_CFS_Sync.html
Push out Content Locker
Go to Apps and Books --> Applications --> Native. Click on add application. Choose Apple iOS as the platform, then do a search against, "content locker."

Select VMware Content Locker.


Click Save and Assign. Click on the Add Assignment option.

Select an appropriate assignment group and go with Auto for the delivery method.

Go ahead and enable "Make App MDM managed if User Installed,"

Save and publish the assignment. Now Content Locker will be pushed out to your assigned devices when they check in.
Add Repository To Content Locker
Launch Content Locker. Click on the + icon at bottom left corner of the app.


Now add the UNC path for the repository you just created.


You'll be get prompted for a friendly name to give it.

Now the repository will be available from within Content Locker.


Now the repository will be available from within Content Locker.

Tap on the repository and you'll be able to traverse your traditional Windows share, download and upload content.
