
Above is an excellent graphic detailing the capabilities of the VMware Identity Manager Connector. As with the AirWatch Cloud Connector, it allows for a successful integration between your on premises environment and SaaS environment without having to poke holes in any firewalls. All that's required for the integration between the vIDM SaaS instance and the vIDM Connector is out bound 443 connectivity from the vIDM Connector to the SaaS instance of vIDM.
Installing The vIDM Connector
Hop on your target Windows server for the vIDM Connector and run the Windows based installer.

Click next on the welcome screen.

Select the default destination folder.

Enter a hostname for this Connector server.

Skip the outbound proxy configuration unless it's relevant for you. Then at the next screen specify that you want to run the connector service as a domain user account and enter in the relevant credentials.

Click on the install button to begin the installation.

Upon successful completion you'll the, "Installation Wizard Completed," message.

After clicking finish, you'll be presented with a message box providing guidance on configuring the connector. Go with the Yes option to get the configuration page automatically loaded up for you.

Click next.

Set an admin password for the connector.

At the next screen, you'll get prompted for an activation code. You need to grab the code from the cloud based vIDM instance.

Log into your vIDM environment. Navigate to to Identity & Access Management --> Setup --> Connectors. You'll see the unactivated connector.

Click on the view activation code option.

You're going to cut and paste this activation code back into the connector setup wizard.

If things go well, you'll get the, "Setup is complete," message.

Now under Connectors within the vIDM admin console you'll see more info populated about the connector.

Next, we have to associate this connector with a directory.


Hit Save & Next.

Next, select the relevant domain.

Confirm proper attributes are selected.

Enter the group DNs to sync.

Enter the user DNs to sync.

Click on Sync Directory.

Confirm the sync operation completed.

By default, after creating a directory and and associating it with our vIDM Connector, you're connector can authenticate AD user in inbound mode, which involves users directly connecting against the vIDM connector located on the trusted network. Here's what a login looks like in environment when the connector is setup in outbound mode. After selecting I want to authenticate to the LAB.LOCAL domain, I'm redirected to a url for the enterprise connector. So here's the initial login to my SaaS instance.

After selecting to login to my AD domain, my browser is redirected to the vIDM Connector I've just setup, entconnect.lab.local. In my environment, I haven't setup a certificate yet, so I initially get this error regarding the SSL cert on my vIDM Connector.

After clicking to continue to the website, I get a login screen for my local AD environment.
After entering in my domain credentials properly, I'm successfully logged into my Workspace One portal.

If you want folks to authenticate directly against vIDM in cloud, rather than directly against the vIDM connector, you can enable outbound mode.
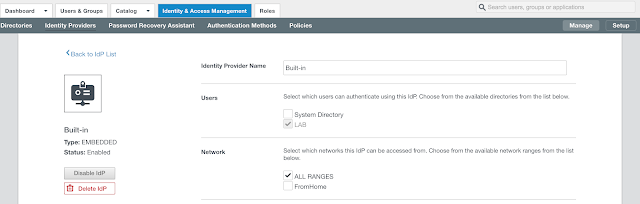
Click on the hyperlink for Built-in. Select the relevant directory and network ranges. Then scroll down.
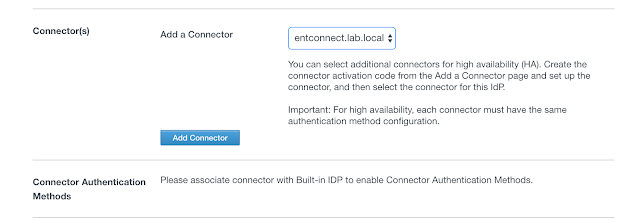
Under Connectors, select your new vIDM Connector. Then click on the, "Add Connector," button.


With your vIDM Connector integration with your local AD environment complete, you can now proceed to integrate vIDM with your on premise Horizon environment according to these instructions, Integrating A Cloud Instance Of VMware Identity Manager With On Premise Horizon.

Click next on the welcome screen.

Select the default destination folder.

Enter a hostname for this Connector server.

Skip the outbound proxy configuration unless it's relevant for you. Then at the next screen specify that you want to run the connector service as a domain user account and enter in the relevant credentials.

Click on the install button to begin the installation.

Upon successful completion you'll the, "Installation Wizard Completed," message.

After clicking finish, you'll be presented with a message box providing guidance on configuring the connector. Go with the Yes option to get the configuration page automatically loaded up for you.

Click next.

Set an admin password for the connector.

At the next screen, you'll get prompted for an activation code. You need to grab the code from the cloud based vIDM instance.

Log into your vIDM environment. Navigate to to Identity & Access Management --> Setup --> Connectors. You'll see the unactivated connector.

Click on the view activation code option.

You're going to cut and paste this activation code back into the connector setup wizard.

If things go well, you'll get the, "Setup is complete," message.

Now under Connectors within the vIDM admin console you'll see more info populated about the connector.

Next, we have to associate this connector with a directory.
Binding To Your Local Active Directory Environment
Before creating your AD directory, ensure you have the following attributes enabled under your users settings. If you don't set this properly ahead of time, you wont be able to change it after creating the directory. (To make changes to enabled attributes, you'd have to blow the directory away and recreate it. So just take care of it properly ahead of time.)

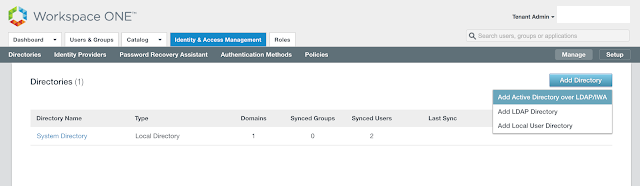
After confirming your attributes are straight, proceed to Identity & Access Management --> Manage --> Directories.

Click Add Directory.

Select the option for, "Add Active Directory over LDAP/IWA."

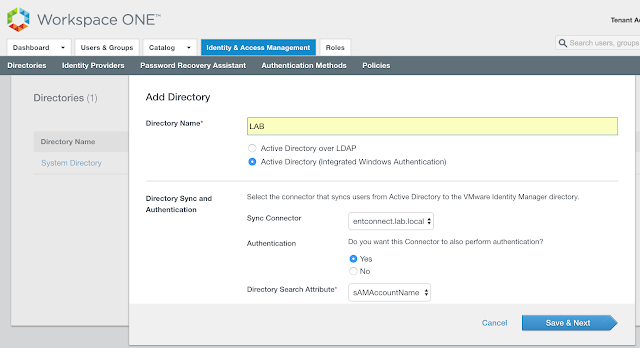
Add the name of your directory. Ensure your vIDM Connector is selected as the Sync Connector. Choose Yes for, "Do you want this Connector to also perform authentication." Then, scroll down a bit and you'll get prompted for an account to bind with. Enter the bind account name in a user principal name format. So something like, username@your_domain.com.

Hit Save & Next.

Next, select the relevant domain.

Confirm proper attributes are selected.

Enter the group DNs to sync.

Enter the user DNs to sync.

Click on Sync Directory.

Confirm the sync operation completed.

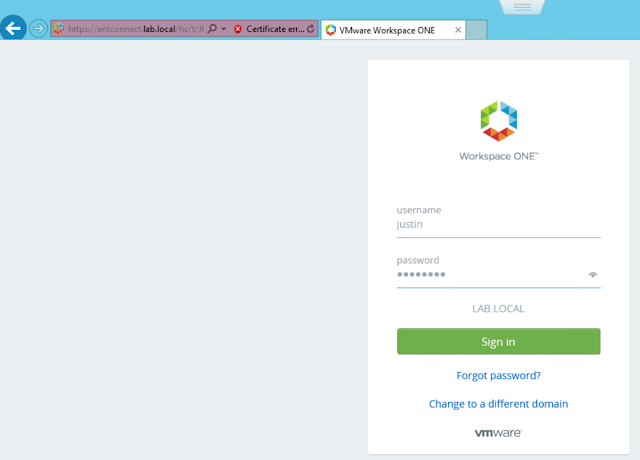
By default, after creating a directory and and associating it with our vIDM Connector, you're connector can authenticate AD user in inbound mode, which involves users directly connecting against the vIDM connector located on the trusted network. Here's what a login looks like in environment when the connector is setup in outbound mode. After selecting I want to authenticate to the LAB.LOCAL domain, I'm redirected to a url for the enterprise connector. So here's the initial login to my SaaS instance.

After selecting to login to my AD domain, my browser is redirected to the vIDM Connector I've just setup, entconnect.lab.local. In my environment, I haven't setup a certificate yet, so I initially get this error regarding the SSL cert on my vIDM Connector.

After clicking to continue to the website, I get a login screen for my local AD environment.

After entering in my domain credentials properly, I'm successfully logged into my Workspace One portal.

If you want folks to authenticate directly against vIDM in cloud, rather than directly against the vIDM connector, you can enable outbound mode.
Setting Up Outbound Mode
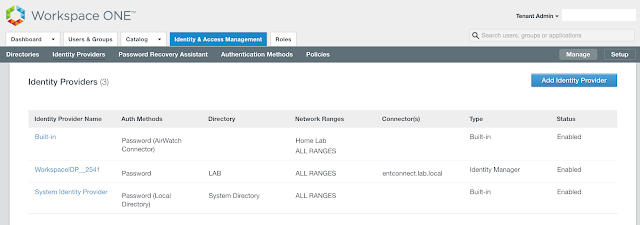
We can enable outbound mode by associating our new Connector with the Built-In identity provider. Navigate to Identity And Access Management --> Manage --> Identity Providers.


Under Connectors, select your new vIDM Connector. Then click on the, "Add Connector," button.

You'll now have the option to select Connector Authentication Methods. Select the option for, "Password (cloud deployment)."

After changing your access policy rules to use the Password (cloud deployment) authentication option, you'll have the ability to authenticate against the AD environment directly from your SaaS instances, without having your browser redirected to the vIDM Connector. Your transition to outbound mode is complete.

With your vIDM Connector integration with your local AD environment complete, you can now proceed to integrate vIDM with your on premise Horizon environment according to these instructions, Integrating A Cloud Instance Of VMware Identity Manager With On Premise Horizon.
Great document - One slight change. The "user settings" should read "User Attributes" in the following section
ReplyDeleteBinding To Your Local Active Directory Environment
Before creating your AD directory, ensure you have the following attributes enabled under your users setting <------ attributes
Change User Settings to User attributes